Testing puppet configs with docker

Many moons ago at $dayjob I created puppet configurations for various systems, at the time my development process was to write the code in a development environment, and then deploy it to a test VM. This gave me the benefits of being able to setup a machine with the standard company baseline, take a snapshot in VMWare, apply my work in progress config, and revert the snapshot back to try again with changes. This works brilliantly. However it does require you have snapshotting available on your VM infrastructure.

Fast forward to today, my aims are a little smaller (my own personal infrastructure of machines) but I still don’t want to wipe anything out so I am obviously wanting to test my code safely before committing to “prod”. Rather than dig into snapshots again, I thought I’d try something a little different. Can I do roughly the same with Docker?

It looks like I might just be able to, although this is pretty rough, it should hopefully be a foot in the door, it certainly seems to work for my experiments.

I am using a simple Dockerfile to build and configure a container which has Puppet installed and a signed certificate. With this container I have essentially a blank server that is registered with my Puppet Master. Each time I stop and start the server I am back to this blank slate, perfect for making sure my scripts will take bare metal to finished product.

The build does require generation of a cert, and you will quite likely end up with a “fun” docker host name in your system. To prevent the Puppet agent generating a new cert each time you run the container, you need to name the certificate in the agent config that will be used. This will be what it is called in your Puppet Master CA too, so make it some thing obvious, it also won’t match the hostname as those are generated by Docker as it runs, and you cannot force one easily whilst building a container (which is the point the cert if being generated and signed). To keep things simple I also downloaded the puppet6-release-bionic.deb file

wget https://apt.puppetlabs.com/puppet6-release-bionic.deb

My configuration files for my little hack are as follows, agent.conf:

[agent]
  server = your.puppet.server.here
  certname = your.certificate.name.here
  environment = dev
  listen = false
  pluginsync = true
  report = true

and the dockerfile:

FROM ubuntu:18.04
COPY puppet6-release-bionic.deb .
RUN dpkg -i puppet6-release-bionic.deb && echo PATH=\$PATH:/opt/puppetlabs/bin >> /root/.bashrc && apt update && apt install -y puppet-agent
COPY agent.conf /etc/puppetlabs/puppet/puppet.conf
RUN /opt/puppetlabs/bin/puppet agent --test --waitforcert 10

Now to build the container:

docker build -t puppet-test . -f puppet-test.Dockerfile

Which will install the packages and perform the initial run of Puppet agent generating a cert and waiting for it to be signed. Once it hits this stage it will poll the Puppet Master CA every 10 seconds to check for a signed cert, so find and sign that cert

# puppetserver ca list
Requested Certificates:
    your.certificate.name.here     (SHA256)  Cert fingerprint
# puppetserver ca sign --certname your.certificate.name.here
Successfully signed certificate request for your.certificate.name.here

At which point Docker build should complete and if you check your docker images you should see puppet-test (or whatever you decided to call it). If you check Foreman or however you are viewing your hosts you will likely see some Docker hostname’d box has appeared with your build machines domain name attached. This is the entity that you need to apply your configuration to test to. With the config set run the container

docker run -it --rm puppet-test

and you will be dropped in at the command prompt, all you need to do now is run Puppet Agent and watch that config apply!

root@6921f888d861:/# puppet agent --test
Info: Using configured environment 'dev'
Info: Retrieving pluginfacts
Info: Retrieving plugin
Info: Retrieving locales
Info: Loading facts
....

Ctrl-D or exit will get you out of the container, and running it again will put you right back with a blank config! perfect for testing new changes.

(remember, if you don’t run your container with –rm you will need to clean up old instances and volumes at some point before you run out of disk 🙂 )

Hopefully this will be useful to someone else, mostly this will help me remember what I did when I forget in 5 minutes 🙂
Ubuntu 18.04 – LOCKS UP AT LOGIN AFTER UPDATE (VMWARE)

Last night I did what I imagine a lot of people do, click the OK on the Ubuntu package updater, let it do it’s thing and then restart later. I was only doing a bit of late night work and off to bed. This morning… well fire up VMWare Player, start my Ubuntu VM, and it gets as far as where the Login prompt would appear, if I squint I can see the “Ubuntu” logo VERY faintly at the bottom and the dark purplish tint to the screen. The VM is fully unresponsive :/

I have however managed to recover from this. Initially I thought it could be related to the nVidia drivers on the host being updated (Windows 10 Host), tried disabling 3D etc found and followed this helpful guide (not the fix for me) Fix Ubuntu freezing with nVidia but that did at least get me into the system by adding nomodeset to the kernel boot in GRUB.

So at least now I am able to boot, but everything is a bit sluggish, and I cannot enable full screen on the VM. I then found this very helpful page, Rolling back recent updates specifically the 1st answer by “user unknown”.

What I did was to use the info in that page to find what has been updated, and then roll things back in the order that I guessed could be the most likely candidates and attempt to boot again afterwards.

 find /var/lib/dpkg/info/ -name \*.list -mtime -1 | sed 's#.list$##;s#.*/##'

Got me a list of packages that were updated in the last 24 hours. I copied this list to a text editor on the host machine and removed the unlikely candidates (pretty confident LibreOffice is not involved in the graphics drivers or login process in any way 😉 )

With my list of suspects I gathered the install versions with policy

apt-cache policy libgles2:

Which gives an output along the lines of

libgles2:
Installed: 1.0.0-2ubuntu2
Candidate: 1.0.0-2ubuntu2.3
Version table:
*** 1.0.0-2ubuntu2.3 500
500 http://us.archive.ubuntu.com/ubuntu bionic-updates/main amd64 Packages
1.0.0-2ubuntu2 500
500 http://us.archive.ubuntu.com/ubuntu bionic/main amd64 Packages
100 /var/lib/dpkg/status

From this I can see that the installed version of libgles2 is 1.0.0-2ubuntu2.3 and there is an older version of 1.0.0-2ubuntu2 available (be wary, there may be security packages between major releases, this may have longer versions with the word git in the version, probably wise to try and go for these.

Now, I attempted to roll this one package back but as it has dependencies with other packages this could upset a great many things. Pay EXTRA special attention to the output from apt-get install You don’t want to be removing your whole desktop system!!! To perform a downgrade

apt-get install libgles=1.0.0-2ubuntu2

This will spit out a whole bunch of dependency errors and things that will be removed. So each needs to be inspected in turn, at one point apt was kindly offering to downgrade some packages and remove most of my system! just say no kids! find the extra missing dependency and you should just see apt DOWNGRADE the packages you have listed.

In my case it took me 4 attempts, it may only have required me downgrading the final set of packages (in my instance mutter) but I haven’t tested combinations so I suggest people check with their own systems and carefully read the outputs. I did also revert the kernel to a previous version too (didn’t work) so this may be part of the issue. By all means attempt the downgrade of mutter first, hopefully that is all it was. Anyway, the full list of downgrades I did in order were as follows:

#Attempt1:
apt-get install libgles2=1.0.0-2ubuntu2 libegl1=1.0.0-2ubuntu2 libglx0=1.0.0-2ubuntu2 libglvnd0=1.0.0-2ubuntu2 libgl1=1.0.0-2ubuntu2
#Attempt 2:
apt-get install linux-image-generic=4.15.0.20.23
#Attempt 3:
apt-get install mutter=3.28.1-1ubuntu1 gnome-shell=3.28.3+git20190124-0ubuntu18.04.2 gnome-shell-common=3.28.3+git20190124-0ubuntu18.04.2
#Attempt 4:
apt-get install mutter-common=3.28.1-1ubuntu1 gir1.2-mutter-2=3.28.1-1ubuntu1 libmutter-2-0=3.28.1-1ubuntu1

Obviously, check your own install and versions.. this worked for me, and hopefully the details of how I did it will help others (or myself if it happens again 😉 ) I am not responsible if following these steps you trash your system, this is what *I* did to fix *MY* install 🙂

Python on Windows not using Visual Studio C++ compiler

My current work has me using Python2.7, which on occasion requires a package with some yummy C++ at it’s core.  Obviously this will require compiling before it can be used.  This is handled by “pip” quite nicely, but it can be a little brain dead.

As I am also working with various other languages I have Visual Studio 2015 installed, with C++.  So when I came to install a package and pip claimed there was no C++ compiler and to download a custom C++ 9.0 package from Microsoft specifically for Python I was a little confused.. (SPOILER: The Microsoft package, whilst nice of them does seem to be missing a few headers.. stdint.h for one.. *sigh*)..

Anyway, thankfully there is quite a simple fix via the power of environment variables.  If you run the command “env” within a command prompt you will get a list of that instances current environment variables.   Look through them and you should find (in the case of Visual Studio 2015) something like: (If you have a different version of VS installed you will see a different VSnnn)

VS140COMNTOOLS=C:\Program Files (x86)\Microsoft Visual Studio 14.0\Common7\Tools\

Now what the Python build environment is looking for (in the case of 2.7) is “VS90COMNTOOLS” environment variable…

Thankfully the Microsoft compiler takes the same options between versions, so a quick fix is simply:

set VS90COMNTOOLS=%VS140COMNTOOLS%

which will set the environment variable Python2.7 is looking for to point at the VS install.. hey presto!

However! this will only affect the Command Prompt you are currently using.  If you wish to make this more permanent, you should set this on your systems environment variables within control panel (and remember to restart your Command Prompts!)


Courier IMAP problems with STARTTLS (Checking mail server capabilities)

I have recently upgraded my mail server from Debian Wheezy to Debian Jessie, which along with it brings new versions of software, including Courier. For the most part this hasn’t been an issue except when it came to the IMAP service. On Thunderbird clients you would see “Checking mail server capabilities” and nothing more when connecting to the server, other clients I assume would have differing error messages, or just flat fail to connect. A quick fix was to switch the clients to SSL, BUT this I don’t think is a good fix as it requires your users to have to make a change. I have thankfully after much googling discovered what seems to be a fix (works for me ™ ).

Courier now uses dhparams.pem (Generate Diffie-Hellman Parameters – OpenSSL Wiki article). Now my fresh new courier install already had one of these present, but I suspect this may be too small. Regenerating this with a nice big 2048bit version rectified my STARTTLS issues instantly (well I did restart courier-imap and courier-imap-ssl too 🙂 )

The command I used is :

openssl dhparam -out dhparams.pem 2048

(This WILL take a fair amount of time, don’t worry it does finish 🙂 )
whilst within the /etc/courier path, followed by a restart of the imap services. My original dhparams.pem file was 201 bytes, after generating a new one it is 424 bytes 🙂

Hopefully this will help save someone’s hair 🙂

Mallorca with team Glow

Late last year Aileen joined Team Glow (a womens cycling club), and this last week has been their trip to Mallorca. Thankfully I was able to go too (yay!) and join in on the rides. Also strapped to my noggin was my trusty GoPro Hero camera for recording going down big hills very fast 🙂

And this is what I’d like to post here 🙂 In a rough order of when they occurred 🙂

First up, the descent from Col d Orient, this was on our 4th day, and was part of a 72 mile ish loop with 4000ft of climbing 🙂

There were two descents, the first being from the top of Col d Orient trough the town of Orient and then climbing up to Col d Honor.

I much prefered the climb to Col d Honor to the one of the Orient, felt faster for some reason!

After climbing that, next thing to do was to descend into Bunyola! 😀 Really enjoyed this descent, just wish I could have gotten past the guy in the BASF jersey towards the end :/ ah well next year perhaps 🙂

Day 5 was a rest day, so just a 16 mile jaunt along to Alcudia for lunch with Aileen, saving our legs ready for Day 6, which was Sa Colabra!

Unfortunetly my Garmin had a funny (possibly heat releated?) and mislogged some of the points on the climb so I didn’t get a time from top to bottom 🙁 my first ever cat 1 climb and part of my data is messed up! typical.. next year I guess :), thankfully the GoPro didn’t fail to record my descent. Probably could have got a better time down if it weren’t for all the damn Armchair warriors sat in this airconditioned bloody coaches.. bloody tourists ;D

After climbing back up there was the ride back, which also meant a descent of Familla which I missed recording on our Lluc climbing day. Possibly my fave descent glad I got to do it twice, and this time record it, and race along with team Glow 🙂

Our last day cycling, so why not go for a nice easy ride along to the Cap d Formentor (Lighthouse)… easy… sure… 🙂 And we even added in some extra climbing too, you know.. because :/ 😀

Had another sprint along on the way back towards Pollenca too.

These are my video’s so far, I’ll add a few more as I get them processed and uploaded 🙂

State of modern ‘Arcade’ games and perhaps society?

Had a play on some modern arcade machines at the weekend.. what a sham! £2 to play and I suspect player involvement is fairly optional to the gameplay on the most part. I completed the 1st section/level was told well done and then insert another credit (£1) to continue.. WTF!

Utter conning robbing garbage! They had 2 similar designed ‘pods’ one a Star Wars x-wing fighter ‘sim’ the other a Jet fighter ‘sim’ both pretty much identical games with essentially different gfx and sound.

Was highly disappointing. That coupled with the ‘ticket’ based rewards ‘games’ where it’s not possible to NOT get tickets, and what you do get are pretty much worth less than the paper they are made of. Is everything these days so dumbed down so as to appease low attention, unskilled, drooling muppets looking for constant gratification? For me its a depressing glimpse into society as a whole 🙁

GRUB physical volume pv0 not found – one fix

I have had one of those days today…

One of the mount points on my server had gotten a little tight for space, so I decided to grow it before it became a problem. Naturally I use LVM so that’s not an issue.. well assuming you have free space on the LVM physical volume that is.. Thankfully this is a server running under virtualisation, so adding an additional physical volume was a simple task and the expansion went as you would expect, flawlessly.

Whilst I was at it, I thought I’d upgrade this box from Debian Squeeze to Wheezy too. Already running Wheezy elsewhere and an upgrade I have done plenty of times to trust (mostly 😉 ). That went well, but there were a few little grumbles around grub complaining about a missing PV that worried me. So I took a snapshot (including VMs memory) before running the magical restart. I am VERY glad I did!

Alas it seems there is a bug in GRUB 1.99 that from my Googling seems to have been around a while! It seems as though it isn’t too happy with an LVM configuration with multiple PVs. Reverting my non-booting box back to it’s running snapshot I was able to attempt ‘update-grub’ and be greeted with a long list of errors regards PV0 not being found.

Thankfully, I think I have found a work around! Although it’s not pretty and a bit time consuming. Essentially present a new PV to the box that is large enough to accommodate all existing PVs data (and probably a little extra growth room), then move your data to this new PV from all the original PVs with pvmove. This will take some time, running pvmove -v in another session/terminal you can at least see progress of the migration.

Once all the data is in your new PV, remove the old PVs from the active VG, then remove them from the system with pvremove. (They can still be connected and show as disks, just not PVs). With that done, run update-grub again, and fingers crossed you should have a bootable system once more.

I would certainly recommend you fire off a new snapshot including memory before rebooting, it’s an excellent safety net to get you back on the box.

Hopefully this will help someone else get out of this situation if they are unlucky to find themselves in it.

Memory alignment bugs, old and new! (fun with Havok)

Writing low level code (assembly) on a system with an .. interesting architecture meant that I soon experienced the joy of memory alignment bugs. These typically present themselves in a completely mysterious manner to the uninitiated. A perfectly functioning piece of code runs happily, then you make a simple non-impacting change somewhere else in the code, possibly even in a section of code that isn’t even being executed, and BOOM! either weird behaviour, or an outright crash!

The first few times I experienced these kinds of bugs it was pretty harrowing, as the changes I was making simply didn’t add up to the output I was seeing. It was almost taking me back to the dark days of computers working on voodoo and black magic! Thankfully, I eventually became able to spot these kinds of errors for what they were, simply alignment errors!

An alignment error in code is where an instruction resides in memory incorrectly. A simple example is for the 16bit processor the Motorola 68000, all instructions must be even aligned. That is, all instructions must start on an even memory address. Addresses of 4, 8, 6, 100, 4096 are all even, and hence fine for an instruction, 5, 9, 7, 101, 4097 however are not. In the example of this CPU you will get a nice helpful address error from the CPU, which helps you realise what is wrong and start working to fix it.

This is quite a well understood bit of low level programming knowledge, so why mention it here? Well, I am currently spending my free time playing with some PC development in C++, using some of the wealth of freely available tech out there to create something, in this somewhat higher level language I have once again fallen foul of the alignment error!

Not something I would expect in a compiled language, I am quite new to using C++ and especially with this level of complexity too, so the seemingly random crashes and exception errors completely caught me off guard. I was feeling quite safe, thinking that the compiler would simply “do the right thing(tm)” and all the woes of low level assembly programming would be behind me, but no! It seems the alignment error persists.

In this case it has occurred whilst working with the rather amazing Havok Physics engine (a free binary only version with limited license is available thanks to Intel here). Naturally processing complex physics maths to the scale that Havok does requires a fair amount of CPU, and as such they have optimised their engine over time. This has lead to their use of their own custom memory management code and lots of clever ways to optimise memory and CPU time, some of which requires specific memory alignment!!!

I am not one for reading manuals.. I like to jump in and learn by playing with tech, unfortunately for me, there is a LOT to learn and I have managed to through what must be pure luck achieve some exciting results quickly. As I have refined this knowledge however my luck buffer has clearly depleted and I have started hitting issues.. so in typical man style.. now that smoke is pouring out, I am consulting the manual 🙂

Frankly, I’d recommend spending a good chunk of time reading through the Havok user manual, there is a wealth of knowledge and examples in it, and it actually (for me at least) makes for interesting reading!

For anyone else out there battling with their compiler, wondering why their code sometimes works and sometimes doesn’t sometimes even running the binary 2-3 times will yield different results and errors.. You may have an alignment issue! I found this article on the Intel forum enlightening, and then a bit of a read of the “Memory” section of the manual.

I have now adjusted my base class for my physics object to inherit from the hkReferencedObject class and so far things seem better. If your class cannot inherit from this then the macro’s HK_DECLARE_NONVIRTUAL_CLASS_ALLOCATOR and HK_DECLARE_CLASS_ALLOCATOR may be your salvation. These will ensure that the Havok memory allocator and correct alignment are used when a new object is constructed (hopefully 🙂 )

In my case I was seeing errors like “Access violation reading location 0xffffffff”

So, cycling

Yeah, I like cycling now.. quite a bit 🙂

One thing I have noticed a few times on my commutes to and from work is how slow cars actually are. Sure when you are cruising along at 30-40 mph you are going a lot faster than your average cycle commuter.. but.. then comes the traffic…

Tonight for example I noticed a van at a junction heading the same way as myself. It pulled away and disappeared as I merrily peddled away at my usual ~20MPH pace… but then at the next junction/lights I drew parallel to it, this happened several times along probably a 5 mile stretch of road until we finally went our separate ways.

I am a good cyclist, I stop at all red lights (even empty pedestrian crossings) and stay behind the white line at lights (I like not being fined or squished). So it is logical to say that whilst the van could easily hit speeds of 30MPH+ our overall average speed across that distance was the same, but I probably found it less frustrating as I quite enjoy my rides. Also cheaper, less pollution AND (motorists pay attention) I took up a lot less room on the road!

Now if only more people cycled to work, the roads would be a lot more pleasant and we’d probably all be a lot healthier… (and able to eat LOTS of CAKE! 😀 )

Curse you CPAN! (LIBXML2_2.6.0 not defined)

If you have seen the following error, possibly starting up Apache2 on your Linux box and you can’t for the life of you figure out why.. it MIGHT just be CPAN as the ultimate culprit. There is a good chance you may have a conflicting version of libxml2 in /usr/local/lib probably with a bunch of other libs too. As I didn’t install these myself, the only tool I can think of that will have done will be CPAN when a package has been installed via it.

Thankfully the fix is simple, remove the libs from /usr/local/lib that are conflicting, and don’t use CPAN 🙂

This may break your Perl module it installed, but hopefully will restore the usability of your system. My recommendation would be to only use packaged versions of your Perl modules to ensure system integrity, save you some headaches later in life.

Hectic!

Wow, life suddenly got VERY hectic for me!

Crazy busy at work with all mannor of projects, all far too secret for me to divulge here :)  But those have to come second to what is really taking up my neural ticks in thought process..  My oh so lovely girlfriend… yeah yeah, I know, soppy blergh etc.. but this is a tad different!

How so? well (as I am sure anyone who has suffered being in my presence for the last few months can attest), she is representing Great Britain at the Paralympics!  So proud of my good lady am I! Hope you will join me in cheering her on, I’ll be there myself in person cheering away, for those who are not, I believe all the coverage is going to be on Channel 4.  Her events are Track cycling, Tandem B/Vi 1KM TT on 31st of August at 9:30 and the 3KM Pursuit on the 2nd of September at 9:30 with the final on the same day at 14:00.

Her athlete profile on Channel 4 is here

So proud, I am a very lucky boy!

Shower coding!!

Seems I have some of my best coding breakthroughs in the shower.  Hot on the heals of my recent sound engine release I had a think in the shower today about further optimisations I can probably build into it.  I have quite a significant rewrite planned, but a low level component of this rewrite worked on using 32bit cache buffers for sample data (recent release uses just 16bit ones).

As the samples used are all 8 bits, a 16bit word can obvioulsy hold 2 samples, thus half the number of time the DSP has to talk to main RAM, reading the sample data once from main RAM and then the next subsequent read from it’s own cache.  As the resampling will in some cases simply need the same sample n number of times, this saves a chunk of bus time.  The reason I chose 16bit originally is the DSP only has a 16bit data bus connection to the main RAM (more of an IO port style connection IIRC).

Thinking about it, I am assuming that 1x 32bit read will take less system resource/bus time than 2x 16bit reads seperated by several ticks of other instructions.  Especially as whilst the DSP is making its 16bit reads, nothing else can be using the bus and will need to have been paused.  I am most impressed with how little additional code was needed to support this change, the current code has to translate the requested sample address to determine if it has it in cache, then retrieve just the single byte from the cache that is needed, it all came together very nicely.

I imagine the overall gain will be quite minimal, but every little helps, I have sent the code off to be tested in a real world environment, hopefully there will be some positive results 🙂

Next up is a complete rewrite of the render subsystem for the sound engine to effectively invert the way the cache works and hopefully keep the DSP off the bus even more!

SoundEngine new release

Well as my very lovely lady is away, and I seem to have irked my hamstring somehow AND the weather here is utter rubbish at the moment I thought I would crack on with some improvements to my Sound Engine.

Last few days have been spent faffing with the Vibrato effect, this effect takes two parameters, one sets the frequency and the other the amplitude of a pitch distortion of a playing sound.  It always gives me a headache to code, and as my OCD tends to want perfection that irks me further.  The amplitude is based on 8ths of a semitone, of course as these are calculated by a non-linear expression it requires some look up action.. but then if you are coming off the end of a slide, there is a good chance that the current playback period may not actually exist in your lookup table.. so I engineered a less than accurate, but hopefully good enough work around.

So I compute a percentage of the current period which is approximetly the same size as an 8th of a semitone between the current note and it’s neighbour, so whilst not 100% accurate, it works irrespective of the actual playback period and gives similar audiable effects.

Overall I am quite pleased with my solution, that combined with the other effects I have added support for and the improved timing code so that non 50Hz timing based modules play correctly make quite a lot of modules that sounded a bit iffy now sound bob-on..

Of course this has meant I have had to rethink a lot of previous ideas, had new ideas and subsequently need to re-write a fair chunk of the code before I progress further.. or I will claw my own eyes out, but its all going nicely and I have my most hated effect completed, so the rest should be easy now… should be… 😀

Anyone who is interested you can download it from the website here, complete with a changelog

Hooked… I think

Seems that the ride on Monday has had a lasting effect on me.. I enjoyed it so much I have a hankering for more of the same.  To fuel my newfound addiction I went and looked on bike-events.co.uk for more fun things to do… So I have signed up for the Manchester to Blackpool ride, and have intentions of also signing up for the Manchester to Chester and Manchester 100 rides too.. Just need to decide which (if any) charity I am going to do fund rasing for…

Whilst these are steps in the right direction, they lacked a certain something, I wanted something a bit more.  So in an attempt to find this I had a mooch around on the British Cycling website.. and have now applied for a racing License! hoping to take part in some national races and see how I do in the rankings 🙂

My plan is to go to see a a race on Tuesday after work, and if possible to take part in it myself the following week :)  I’ll post here following that I think.

Exciting times!

52 miles….

Today was the day of the Great Manchester Cycle.  13 miles of closed roads forming a loop that starts at the Eithad stadium along the Mancunian way (A57M), through Media City and past Old Trafford before heading back along the same route.

The event has 3 flavours, 13 miles, 26 miles or 52 miles… of course, I went for the 52 mile option 🙂 this also brought an additional caveat in that I was required to maintain a speed of 18MPH or faster on average to complete the course in time!  I thought what the hell and signed up anyway.

The 52 mile ride started this morning, setting off at 8:00AM with rider assembly at 7:30AM, of course I got a whole 5 and a bit hours sleep before hand :/ and probably didn’t eat the best of foods, but meh don’t want to make things easy for myself now do I!  I was hoping to wear just the event Jersey and my shorts, but despite the sun it was a little cold so I ended up needing my cycling jacket too.. so glad I did that!  My toes were frozen and I never really got too sweaty, not too bad a temp for the ride really (BBC Weather stated around 8 degrees C to about 12 degrees, my Garmin was saying about 13 degrees).

Once we set off the ride out was really rather enjoyable, this being my 1st ride of this type and my 1st real experience of bunches and chains.  WOW! how much fun are they!  Riding along the A57M itself is fun, but when you are doing 30MPH easily, slipstreaming off another rider or two.. awesome!  Which reminds me of another cool thing, the noise.. near silence (other than some chatting).. just the faint hum of wheels on tarmac.  I was quite pleased that I managed to get right up to the lead bunch at the start quickly and without having to push myself!  It didn’t last 🙁 after the pinch point at Media City which almost has the riders single file onto a foot bridge I just lost the bunch and ended up riding solo.. and into that bloody wind, and up hill.. 🙁 🙁 :(  So this really sucked the life and speed out of me.

Thankfully after each lap I learnt a bit more and started looking for wheels to hang off of, actively chasing after a chain to sit in its slip stream.. I was quite pleased to realise I had someone slipstreaming behind me for a fair turn of the route, spurred me on a little to maintain the 25MPH I was doing!

Towards the end of the ride I was pretty tired, this was the fastest, non-stop, constant peddling ride I have ever done, my Manchester to Blackpool rides of previous years have been slower, and involved stops at lights and feed stations.  Today I stopped after the 1st lap for a loo break and that was it!  I didn’t free wheel too much just kept spinning away.  Another boost to my speed and drive was switching the screen on my Garmin to show the current time and my ride time.. until that point I had been concentrating on my average speed more than anything, so had no idea of the time.  Switching to see the time revealed it was a lot earlier than I thought and indicated that I was doing better than I had thought! this really helped spur me on!

A brill day out, lots of fun, I will doing another of this I think.  Which only leaves my stats really…

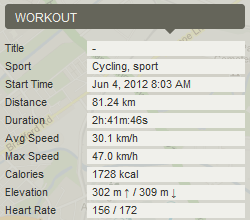
I completed the full ride in 2:42:36 with splits of 42:08, 40:08, 40:39 and last lap of 39:41  (found a good chain that got me most of the way back 😀 )

and the stats from my Garmin via Endomondo are:

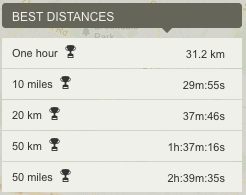
And my best distances were:

Now, I think I’ll go have a bit of a rest 🙂

Time flies…

When you are writing code!

Got stuck into working on some long overdue tweaks to my mod player routines these last few days, finetune and BPM based timing.  Both of which I have now solved and implemented (although some additional tidying will be needed in the future!).  Unfortunetly both require lookup tables at the moment due to the chunk of maths or brute force needed to compute the tables, it works, and if I figure a nicer solution I can always add it later.

Both of the additions only required less than 10 lines of RISC code each to make use of their LUTs, a little bit of buffer space and a bit of main RAM, and bish bash bosh things sound that little bit better.

Still a few more effects I want to get finished off before I roll out this release of the SoundEngine however, but it is being worked on!  I have a chunk of time coming up where I should be doing a fair amount of work on it, so who knows, could be a new SE release in June! watch this space!.. well watch the U-235 website really 😀

WHEEE!

I added another vehicle to the list of those I have managed to get ‘the backend out’ on/in :)  Especially as this will be the second one within a week!

Thought it might be fun to blog all the ones I have had go sideways (a little bit) when they were supposed to go straight.  So in no real order they are:

  • Front wheel drive car with use of handbrake..
  • Front wheel drive car (no use of handbrake!)
  • Rear wheel drive car
  • Mountain bike (YAY FUNS!)
  • Road bike
  • Road Tandem bike ( 😀 )

I think the most scary was the tandem, there was a brief moment of ‘oh crap, this is going over’ which was audibly the thoughts of the stoker from her reactions at the time too :D  It didn’t we were awesome, no it wasn’t intended 🙂


ARGH bloody RISC bugs!

I don’t have much hair, and with the aid of the Atari Jaguar RISC CPUs I am bound to have less with fun bugs like these.  I keep hitting this one, forgetting about it for a few mind numbing minutes/hours/days and then remember it and spend more minutes/hours/days resolving it.  So I thought I would scribble it here…

I am not 100% certain if this is entirely the RISC CPU bug or MADMAC being a bit pants at alignment, but it is possible to generate ‘fun’ alignment issues in your code by simply adding or removing a nop (or other similar 16bit only instruction).  The instruction doesn’t need to be called even! that’s how much fun this is!

From what I can tell it seems that jump instructions are particularly fussy about where they are jumping to, so it is possible that by adding/removing a 16bit instruction you will move a jump destination into one of these ‘un-desired’ addresses and hey presto your RISC code suddenly stops working, or does something weird.  Even though you haven’t changed anything that should cause such behaviour.

So if you are playing with Jaguar RISC code and using jumps and sometimes it randomly seems to stop working but then work again, this could be the cause.  How do you find which jump is being affected? trial and error is my best method, or add a nop just after the code you modified (doesn’t need to be the executed code block), one at a time until your code magically starts working again :/

One day I’ll fully track this down and come up with some fix/work around.. probably :D  Until then, keep hacking!

Improvements

Popped out for an ‘easy’ ride with my lady yesterday.  I say ‘easy’ that’s her deffinition, her easy is more like my moderate, but I am improving at least.  Decided to try the Fallowfield loop out, to see how tandem friendly it would be, only looking to ride for an hour and half.  This soon highlighted my own improvements to me, last time I rode this was a couple of months ago and riding its length and back again was pushing my abilities.  However this time, I found the 10 miles out rather easy, the route however was less tandem friendly than I hoped.  Stopping for lights on main roads is a lot more preferable than having to get off the bike to hoist it over gates etc.  Also playing in traffic (even on a tandem) whilst playing the ‘dodge the pothole’ game is a lot more fun and less risky than dodging kids/dogs and muppets wandering along cycle paths 🙂

After an hour and half of cycling although a bit tired I still had some left in me, so I am certainly improving :)  I think I am going to have to do a fair bit more on my solo bike to get ready for the Great Manchester Cycle (I have entered myself for the 52 mile time limited version!!).. I think I few 50 mile routes will need to be completed.. I think it should be do-able however.  Will be interesting to see how I do against other riders.